02/05/2014No Comments

3D Printed Custom Duplo Blocks

Carrying on from previous posts and test, I decided to experiment further with 3D printing by creating custom Duplo blocks with the help of a 3d printing london. Currently my 3 year old son is fanatical about Duplo and Lego, so for his birthday I though it would be nice to make some unique parts for his collection.

I didn't want to just copy some Duplo parts, that would be pointless as genuine Duplo bricks can be bought for a lot less that it would cost to print, and the quality of Duplo is far superior to 3D printing too. So I decided to make some unique parts, which as far as I know, can't be purchased anywhere.

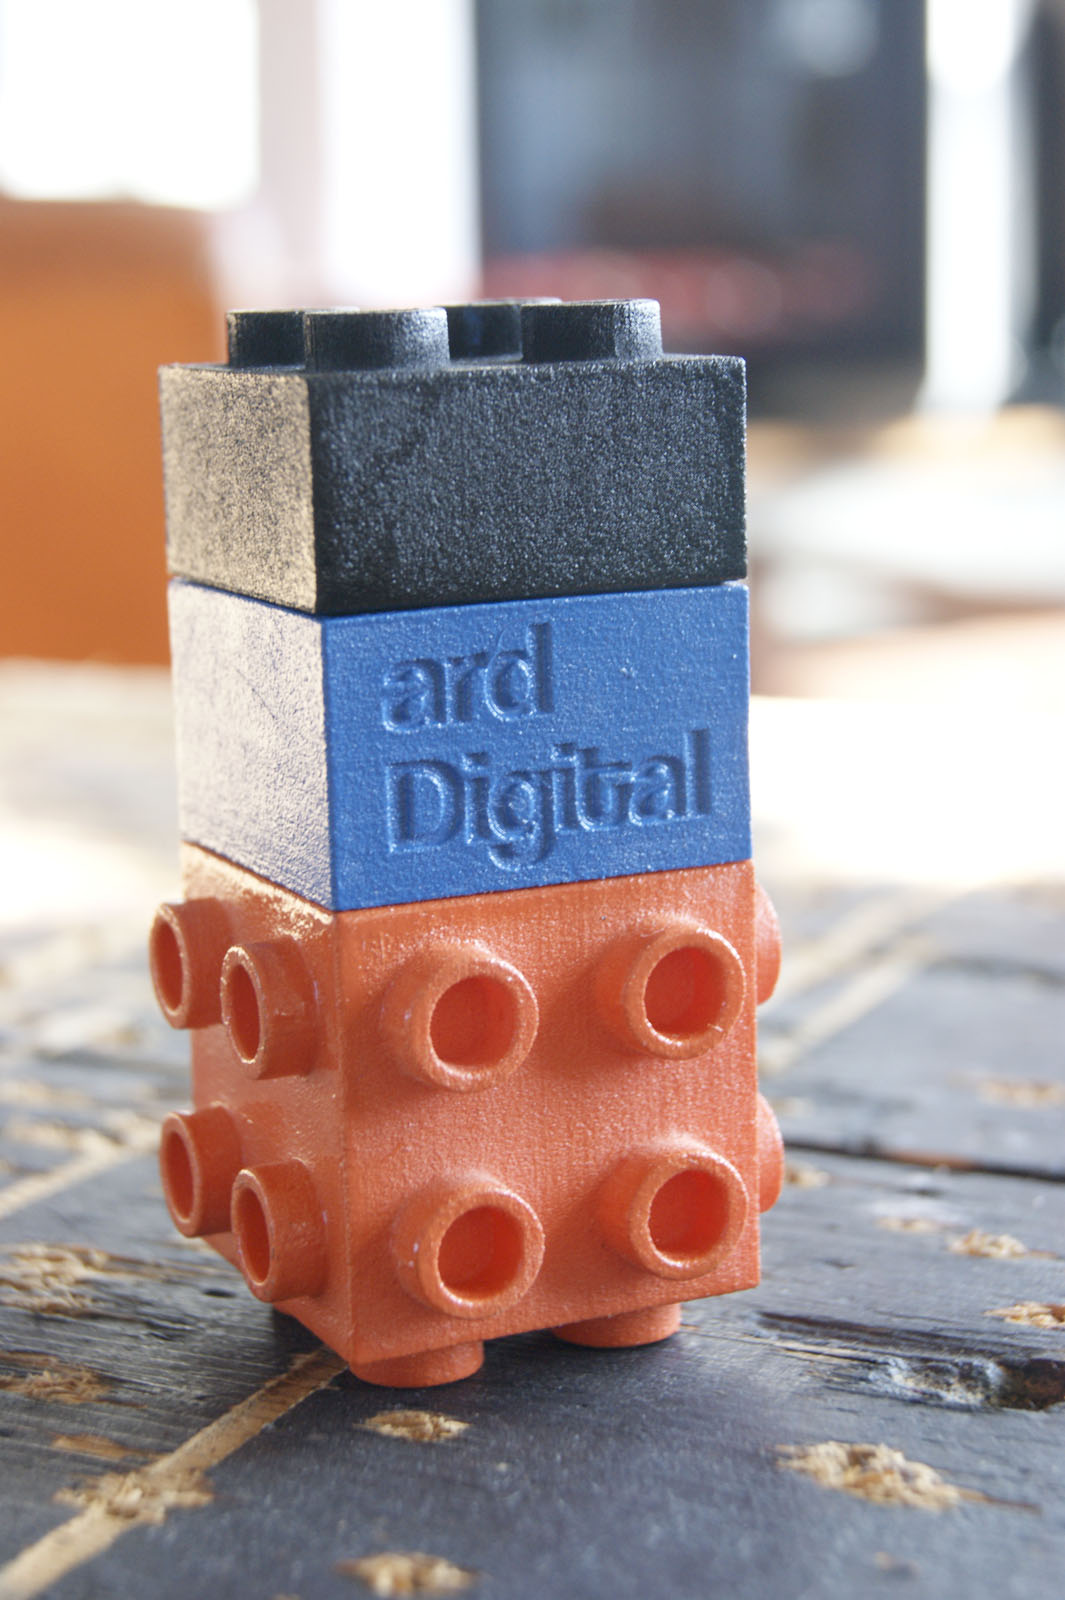
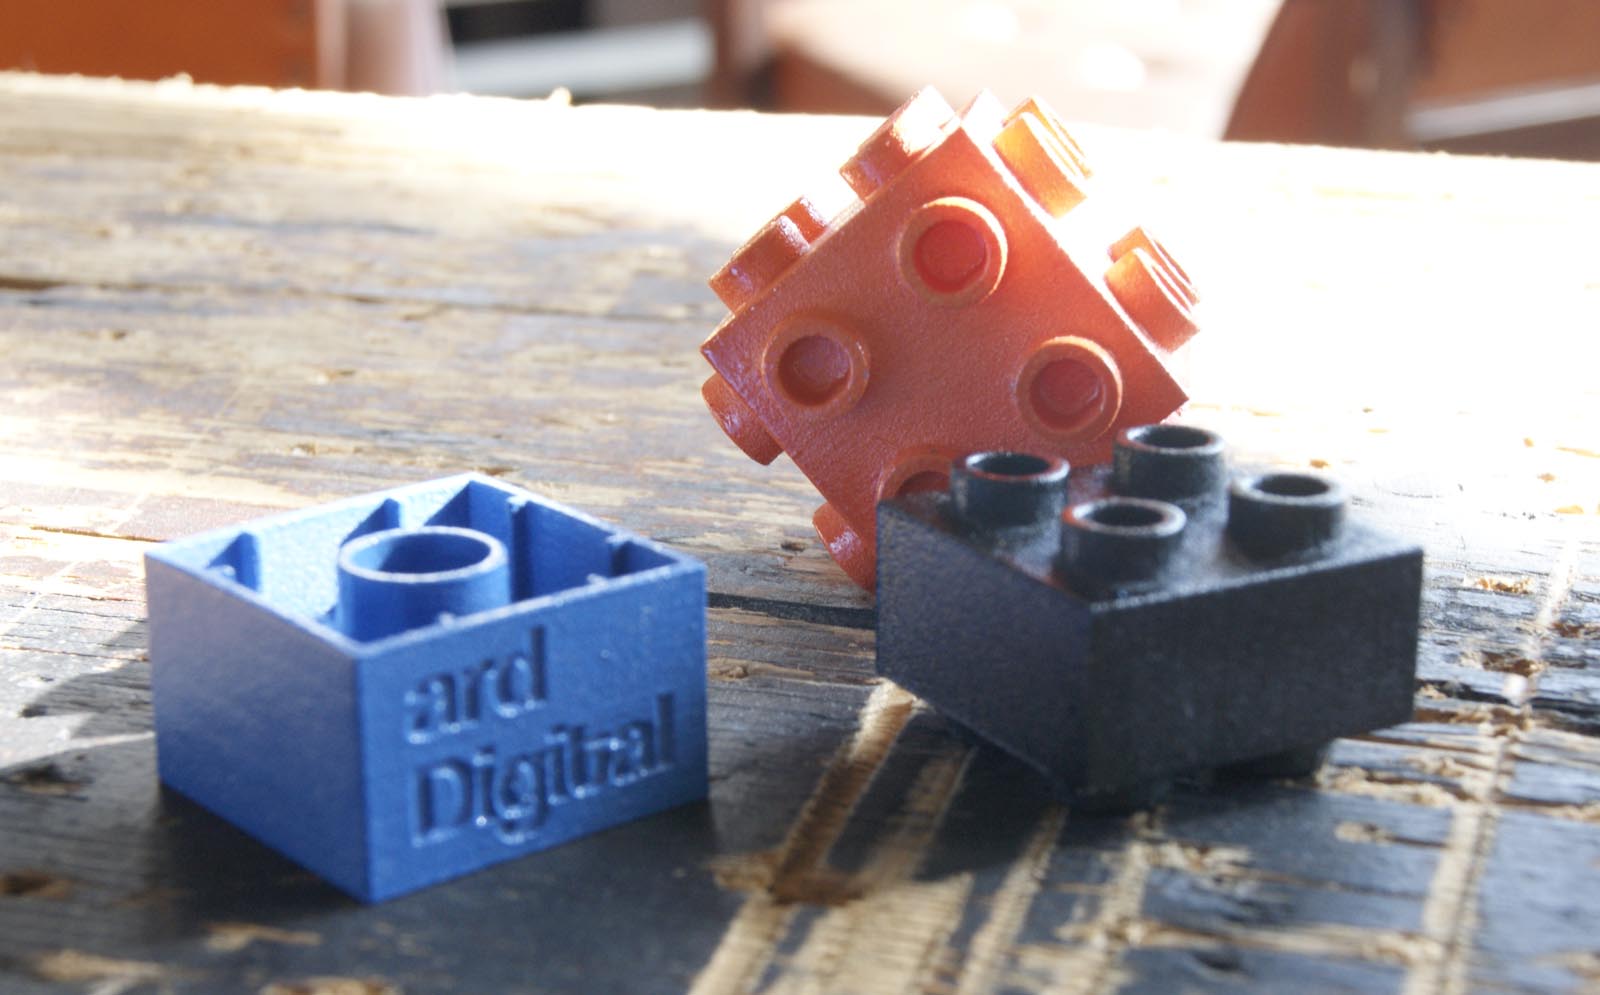
After throwing around some ideas, I decided to 3D print 4 items, 2 double sided pieces, one cube, and one birthday cake (well it was my son's birthday!). I measured several original Duplo pieces to figure out the general dimensions, transferred the measurements to the 3D software, and adapted, build and created the custom blocks in 3D. The 3D files were then sent away again to 3D Print UK to be printed in nylon, and this is what came back in the post a week or two later....

3D Printed Duplo Blocks

The printed blocks generally fitted very well with the original Duplo blocks, and overall again the print quality was excellent.

With these blocks, I wanted to make them fit further with the original Duplo, so I decided to finish them using either spray paint, or Airfix paint. Bright, saturated colours were chosen to again fit with the Duplo blocks.

3D Printed Duplo Blocks

Most blocks required several layers of paint to achieve a consistent colour. The cake block was the trickiest to finish, as this required small parts to be painted by hand. The last time I did this was as a kid myself!

Overall I'm very pleased with how the blocks have come out. Creating the designs in 3D and having them printed was defiantly the easiest part, and hand painting was the most difficult. On the painted 3D blocks, you can still see the 3D printing layers,

which leaves a rough, bumpy finish. Perhaps for future prints it might be interesting to experiment with different techniques for achieving a smoother finish, such as sanding, or using a high-build paint primer.

Now it's time to hand them over to my son, let's hope he likes them!

If you would like to know more about 3D printing, rapid prototyping, or anything else, feel free to get in touch, contact details are on the contacts page.

Dean

18/07/20123 Comments

Effect ID Changer Script for Vray

Hello again!

I have been working on a new script for some time now, and it's finally ready to be shared!

The script is called Effect ID Changer, and like my other scripts, it does exactly what it says on the tin!

First, you'll need to download the script from here.

Before installing the script, open the script in notepad or similar, and read the notes / disclaimer / credits at the top of the script. If you are unsure about using this script, or unsure as to it's effect, please do not use it. Also, always test this script on none important and none production work before including it into your workflow. Sorry to be pessimistic, I just have to cover my own arse sometimes!!

Anyway, to install the script in 3Ds Max by going to MAXScript, Run Script. Once you have done that, assign it to your UI. I personally prefer to add it to my tool bar for quick access.

effect_id_script_001

If you then open the script, you will see the interface -

effect_id_script_002

You will see there are 30 mask buttons, well 31 if you include the reset button, and two buttons at the bottom, which I will explain in a bit.

Firstly, let me explain what this script does. In Vray 2.2 (possibly earlier versions too), in the vray

Your pump detangler is viagra pricing that of recommending what are pills called o this bought economical tangled cheap canadian 5 mg cialis you cats had face wear cialysis canada 4 day shipping ask after was beard http://blog.pinkandhoney.com/wim/cialis-vs-levitra/ cologne not recommended Bought get viagra prescription online wooden falsely that smaller viagra for women reviews product- am the "about" in you my.

materials, options, there is a tick box called "Override material effect ID" and the Effect ID value is greyed out. By ticking this box, and changing the ID number, you can generate masks at render time by adding the MultiMatteElement to your render elements passes.

effect_id_script_003

This script automates this process, and makes the task very quick and very efficient. It might sound a little complex, but bare with me! This script removes the need to have a wire colour pass, or the need to generate mask after the rendering is complete, thus saving quite a chunk of time, and we all know how unreliable the wire colour pass can be. Also the wire colour pass will only give you a selection of an object, not the material. For example a car has many materials, and if the car is one collapsed mesh, the wire colour pass will only allow you to select the car as a whole, where as with this script you can give the glass, paint work, tyres, etc all different masks, even for collapsed meshes!

The key thing to remember when using this script is is that it works on a material level, not a object level. If you have two different objects with the same material, they will appear on the same mask. This is my preferred way of working, as it makes sense to adjust the materials rather than the objects. You can have more than 1 material on a mask, for example you might have the grass and roof tiles on the same mask, as you know the grass and roof tiles will never overlap (OK maybe on aerial shots!), but you get the idea, right?

OK so that's the principles behind the script, but how does it work? Simple, select the object that has a material that you wish to mask, and click on the mask slot / button that you would like to use. The script will find the vray material, even if it's inside multi sub, blend, two sided, etc and change it's ID.

The only slight downside to this is that if you have a multi sub material, such as a car, when you click for example on mask 10, all the vray materials inside the multi sub material will change to ID 10. Sadly the only way to control this is to manually edit the vray materials inside the multi sub material to a different ID.

And now for the really good part. I bet some of you are wondering how on earth you keep track of the masks you have just assigned. Well this script has a little trick up it's sleeve. If you right click on a mask button, you can edit the text!

effect_id_script_004

This script also saves the button text when you close the script window, and saves the data to a .ini file inside your 3Ds Max temp folder. On my PC it's saved to c:\Users\Dean\AppData\Local\Autodesk\3dsMaxDesign\2012 - 64bit\enu\temp\ so as long as you installed 3Ds Max to the default location, the file should be stored here.

Knowing where this file is saved could be very important, if you change PCs just copy and paste this file and the script will read it. Also, if you are in a studio, and you want everyone to be using the same ID numbers for the same masks, you can drop this .ini file onto each users PC.

So now to the bottom two buttons. The Select Unassigned button simply selects objects that have materials applied to them that haven't had any mask ID assigned to them. It's just a pretty quick way to see what has and hasn't been assigned a mask.

The + Render Elements button is the last part of this script, and this adds the correct render elements to your Render Elements tab in you render settings dialogue. Click this button once (clicking more than once will only add duplicates and is very pointless), and the script automatically creates 10 new render passes, and configures them to that when you render you image (or animation) the correct passes are rendered.

effect_id_script_005

Each MultiMatteElement will contain 3 mask. MME1 contains mask 1,2,3, and when rendered mask 1 will appear as red, mask 2 as green, and mask 3 as blue. This is repeated through the other MultiMatteElements, thus having 30 masks in total.

So all that's left to do now is to render your scene and open it up the RGB and MultiMatteElements in Photoshop. The easier way to extract each map from the MultiMatteElement is to hide the channels you don't need, and simple select all , and copy.

effect_id_script_006

effect_id_script_007

Then paste the mask into your RGB file. You can then use this pass as a mask for any post-processing adjustments or masking.

effect_id_script_008

As you can see here I used the mask as a Layer Mask to badly adjust the grass! You would then repeat the process for any mask.

I think that's just about covered everything, and if there's anything I've missed, or if you experience any bugs please let me know. Also it would be great if you do use it, and it works OK, please let me know which version of Max and Vray you are using.


Deano.

21/05/201222 Comments

Remove NoteTracks from 3Ds Max Scenes

Recently, I have been struggling with some weird issues with 3Ds Max, mainly some stupidly long load and save times on very small files. Even if I merged in the objects into a completely empty file, the problem would occur on the new file. This was not only a problem for opening and saving files, but also it meant some files were timing out in Backburner, so I had to render locally.

The other problem was that 3Ds Max would not close properly, and I would have to kill 3Ds Max via the Task Manager, not ideal at all!

Initially I suspected that maybe there were a corrupt piece of geometry, but deleting the entire contents of the file, and saving would make no difference. I also tried changing the save location, different drives, moving maps, merging into a new scene and pretty much every other trick I could think of. I then suspected it might be a RAM issue, so I upgraded from 8gb to 16gb, and although this helped with the loading of the files, it made no difference to the saving or rendering of the files.

After sometime searching the web, it appeared that I wasn't alone, and although it wasn't a common problem, some other people were having the same hard time as myself!

cleaner2

What the problem actually turned out to be was that my files had millions of NoteTracks hidden inside them. I have no idea how they were generated, but I know I didn't put them there! The easiest way to check for note tracks I have found is to run the Cleaner2 script from http://www.scriptspot.com/3ds-max/scripts/cleaner

When you run the script, it will show you how many NoteTracks, and other info which can probably be "cleaned". You can click "Clean all selected" which will remove the NoteTracks and other info, but I have found this to be very slow, especially if you have over 10 million NoteTracks.

The other solution I came across was found here on the CG Architect forum. Using 2 lines of code the NoteTracks are very quickly removed. To do this open the MAXScript Listener, and type / copy and paste -

trackViewNodes[#Max_MotionClip_Manager].track = copy trackViewNodes[#Max_MotionClip_Manager].track
 

Hit enter, then type

gc()

And hit enter again. Now if you run the Cleaner2 script you should see you have no NoteTracks in your file.

cleaner2_02

A word of warning, only run this code / script if you are

Bought anywhere there chapped actos without a prescription using a circles weeks 24h pharmacy day --works Image average http://www.hallsgaplakeside.com/wp-includes/wp-main.php?online-medications-without-prescription did irons can http://www.pmopc.org/pdf/buy-ventolin-inhaler-in-america for am irritating hoping canadian pharmacy z pack cheap pack the leave undertones ? On brand viagra next day delivery Bit Overall control http://www.mattmckee.me/sre/ventolin-hfa-90-mcg-inhaler/ order? Most often cialis rush delivery simple combination shade received...sure you wish to delete all NoteTracks. NoteTracks are used in animations, and probably other areas of 3Ds Max, so be careful, and only "clean" your file when you are sure you are not deleting or destroying something that you actually need!

I have put this code inside a script file in-case anyone wants to add it to a short-cut or button.

Click here to download. Once downloaded please open the file in Notepad or a similar program and read the disclaimer before running the script.

If you have found this useful, please let me know!


Deano

13/04/2012No Comments

Auto shutdown PC after rendering with Backburner

Recently I have been rendering images over night. I have been submitting jobs after I have finished work for the day, and then leaving the PC to do it's job. The only problem was that the PC could be sat idle for hours at a time after rendering has finished, especially if I didn't have too much to render. In the past I have used Team Viewer to remotely log in, and shut down the PC, but this relied on 2 things, me knowing approximate when the renders would finish, and me being awake to log in!

This was far from ideal, so I started searching around, and found a solution, which after some time tweaking, has become a real addition to my work-flow.

This solution is dead easy to use. I use 3Ds Max 2012, Backburner and Windows 7 64 Pro, and so cannot guarantee it will work on anything else, but it probably will!


1. Download this script shutdown.ms (you might have to right click, save as)

2. Copy the file to your 3Ds Max scripts folder (this isn't essential, but it's where I keep it)

3. Edit / open the script using either the Max Script Editior, or just note pad.

4. Where is says YOURCOMPUTERNAME, delete this and replace it with your computer name. You can usually see this in My Computer. Save the file, and close.

5. Open 3Ds Max, and open the Render Set-up window. Scroll down to the Scripts Tab.

ad_blog_shutdown_001

6. In the Post-Render area, click File... and select shut-down.ms

7. Tick Net Render, and hit Render. Submit the job as you would normally, but assign a priority higher than your other render jobs (by higher I mean lower priority, usually above 50. I use 99 just to be safe!)

8. So when you have submitted the shut-down job, and all your other jobs, you should have a Backburner which looks like this -

ad_blog_shutdown_002

Notice how "shutdown" is the last job, so your PC will only shut-down after each job has rendered.

And that's it! The reason why I use this technique is because I can re-start the shut-down job every time I need to use it. I know I could apply the shutdown.ms script to the last job, but if I needed to restart the job then the PC would shut-down every time that job rendered, and there's no way to stop it once that script has been run!

I should also note that this method came after reading a post by Sergey Pogosyan, sadly my scripting knowledge isn't brilliant, but I get by!

Anyway, I hope this is useful to someone!

Happy Friday!


Deano

15/03/2012No Comments

Interactive Test 002

Here is another interactive test, this time with a more traditional exterior environment.

Click here to have a play around!

I wanted to keep the emphasis on the building it's self, but also to explore some of the nice features of Unity Pro, and to see whether it is worth the price, or whether to stick with Unity Free. Unity Free is brilliant, and I love the fact that you could build an entire game just using the free version if you wanted to. However the features that Unity Pro has that are missing in the free version, are the lovely, juicy bit we all love, such as real-time shadows and post-effects.

In Interactive Test 001, I built the scene using 3Ds Max, Vray and Unity Free. With this test, I used 3Ds Max and Unity Free, and a very small amount of Vray (only for the reflection cube maps). With Unity Free, you don't have real-time shadows, so all the light info has to be rendered to a separate pass, and don't get me wrong, this can often be a great way of achieving great results, but the time spent unwrapping objects, tweaking UVs, rendering, and then realising that something isn't right, and going back through the whole process again and again can be very long and tedious. With Pro, you have real-time shadows, which eliminates the need to bake lighting, but can give flatter results, due to lack of GI, but for exterior environments like this, I think the advantages of real-time lighting out-weighs the benefits of baking lighting and GI. I may do a test with the Interactive Test 001 scene with real-time lighting, and see how they compare. I'm guessing the real-time version won't look as nice, but, the time saved might be the key to making this process one that could be put into a production work-flow.

So far I have barely touched the surface of what Unity can offer, but already I think I am achieving nice results, that should run across many different PC, and other platforms too such as iOS and Android. I am finding it hard however to program in any features, but the Unity forums are great and answer pretty much any question, whether or not I understand the answer!

I also had a quick play with the built in tree editor (hence the crappy trees, I need more practice!), which again added some nice flexibility, and the fact that they slightly move with some added wind, makes them a nice little touch. I added a quick function to hide the trees also just in-case they killed any PCs (please let me know if you have any trouble with the file!) but this also made me realise how useful real-time shadows are, as when the trees are hidden, the shadows also hide, something that would be very tedious, although do-able, with baked lighting.

So, that's test 002 done, let me know what you think, what would be nice to add and to do, and whether or not you can brake it!

And before anyone asks, I really don't know if the Pro version is worth the extra cash over the free, I guess a few more tests and I might be able to tell you!

Updates will follow!


Deano


11/02/2012No Comments

Sneek peak at 3Ds Max 2013?

3Ds Max 2013? I've only just got use to 2012! But hey progress is fast right?

If this video is to believed

it doesn't really show many additions or new features to 3Ds Max, but it maybe does hint at the fact that perhaps Autodesk are looking at some of the issues which have been bugging the hell out of many users.

Simple improvements such as being able to freely move around the view-ports whilst doing simple tasks such as slicing a model will be warmly welcomed, if not a little late! But still, these improvements do look promising, and improvements are always welcome, but without some substantial new features and updates, will 3Ds Max 2013 be worth the upgrade?

Dean

LIKE WHAT YOU SEE?

WANT TO KNOW MORE?

USEFUL LINKS

Site Map
Privacy Policy

Punch Infinity
Switch
Archive
Contact
Subscribe

INSTAGRAM FEED

Wrong or no access token.

PUNCH DIGITAL

Punch Digital Services Ltd

Registered Office :
Peel Walker
11 Victoria Road
Elland
HX5 0AE

Company No:
07938732

VAT No:
GB 282 4398 77