20/01/2016No Comments

3D printed miniatures aren’t just miniature!

3D printed miniatures come in all scales. Over the past few months we have been 3D scanning and printing 3D model railway folks in what's know as 16mm (16mm = 1 foot), but if you were to buy 3d printing pen, you'd know that the print size can be almost anything.

Over the past 2 days we've printed miniatured from 2cm to 20cm high, all to suit different model scales. The 3D scan can be scaled to to any size, which is one of the advantages of working with digital files!

SONY DSC
From tiny to large, we print in a range of sizes!

The largest "miniature" here is the driver, standing at 20cm high! The smallest is only 2cm tall. The size difference is large, but the process of 3D scanning and 3D printing is largely the same.

SONY DSC
A 16mm figure looking very smart!

16mm is the most common scale we print, meaning the miniature stand at around 10cm high, with the smaller two models being 2cm and 4cm high. 16mm is a great size to work with, you can see a lot of detail in the miniature, and it's a great size to paint and hold.

miniatures_03_1600-1024x682

Printing at smaller scales can be very tricky, the printer only has a certain resolution, and also the strength of the prints is decreased as we reduce in size. You would struggle to break the largest model even by jumping on it, however a child could snap the smallest print quite easily! A miniature at 2cm high is really the smallest we could print at.

If you're interested in having your very own miniature model, please get in touch!!

22/10/2015No Comments

Stock and Custom 3D models in CGI Visualisations

Throughout my CGI work, the scenes I create will be primarily populated with the building or product, but to set the scene props, landscapes, entourage, etc are added. These items, big or small have to be created and added to the 3D scenes.

Sometimes we use stock 3D models, which are very similar to stock photography. There are websites where you can download a wide variety of 3D models ranging from costing nowt, to hundreds of pounds. Once downloaded, the 3D models can be dropped into a virtual scene and used within the visualisation or animation.

With the majority of my projects I will 3D modelling various parts of a scene. In architectural visualisations I will model the buildings, landscape and other items, then populate the scene with stock library items such as cars and trees. I do this simply because the stock models available for foliage and vehicles is pretty extensive, and it would be counter-productive for me to start modelling these items, which could make the final cost of the CGIs too expensive for many. A collection of 10 cars can be purchased for a few hundred pounds, where as for myself to 3D model just one car would take at least a week, which makes a typical architectural visualisation just too expensive and time consuming.

architecture_nb_shot_2_final_1600Stock foliage used within a custom 3D modelled environment.

With interior visualisations and digital room sets, I find myself using less stock 3D model, in favour of hand creating custom items. My preference to do this has many factors.

  1. Trends within interior design changes on a monthly basis, and as such many of the stock 3D items are dated, and have sometimes been created years ago. This is OK for the design classics, but for items that change with the seasons it's not ideal, and can really impact on the final image.
  2. I can create almost any item in 3D, without it impacting on project costs or time too much. 3D modelling can be very tricky, and getting items to look realistic can also be hard, if not impossible for some, however when I started in the CGI industry over a decade ago (ouch), my speciality was 3D modelling, and doing it fast and good! Over the years I have continued to build on this core skill, evolving processes with every year, taking advantage of new techniques and software to be able to quickly create virtually anything.
  3. Purchasing 3D models from stock sites isn't always straight forward, first you have to find the right model, at a good price (I am a Yorkshireman after all!), and then trust it's OK to use. Then once I've bought the models, approximately 50% of the time the 3D models will need adjustments such as re-scaling or fixing errors, and nearly every time I need to check the 3D model material finishes to be in-line with my techniques and processes. This can be time consuming, and could also become costly.
  4. If I create the 3D models from scratch, I know the models are good, correct and error free. Maybe I'm not very trusting, or perhaps I just have faith in my own skills! Either way I know when I've 3D modelled an item that it's going to look good in the image, and if it doesn't look quite right, I know how to break it apart and improve it.
  5. The final advantage of creating custom 3D items is that they belong to me! I will add items to my personal library for future use, and I will also re-sell the 3D models though my TurboSquid account to other folk. I must admit I don't receive much in the way of sales, but it pays for my dropbox account at least!

Franke Sink Tap 3D Model CGI Kitchen

Franke sink and tap created from a handful of photos and dimensions.

Franke Sink Tap 3D Model CGI KitchenA wire-frame shot showing the 3D construction.

Although creating the 3D models from scratch has it's advantages, it also has its disadvantages. Some items can be very difficult to re-create in 3D. Items such as cloth, plants, and other organic forms can be tricky, so much so that it's not uncommon for these type of items to be photographed in the studio, and super-imposed into the CGI in post-production. This is purely a time-saving technique, anything can be created in 3D, it's generally a matter of how much time is available to complete a job.

modelling_toaster_dualit_01_1600

Dualit toaster, available to buy on TurboSquid

Other disadvantages could be that an items has little information or imagery to create an accurate 3D model. For example it's quite rare to find a piece of furniture photographed from every angle, instead usually the only reference is an angled photo, and generally the photograph will be of medium - low quality or resolution. So to create the furniture does require some educated guess work, and as such can't be too accurate. Clients will sometimes be able to physically send items to be turned into 3D models, which means a greater accuracy can be achieved, and is generally the only way to be certain of getting the 3D model just right.

Although I do find creating 3D models from scratch very useful, sometimes I do purchase 3D models. For interior room sets, I will often pick items from Design Connected, and occasionally TurboSquid and 90% of the time I'll be happy with the purchases. Purchasing these type of models will help speed up the process, which is very useful on projects where time is limited.

Both buying and creating 3D models has its advantages and disadvantages, and the majority of the time the decision to buy or make is made on a project by project case. As I've mentioned cost and time are two factors, however if possible I will always aim to use items I've created myself, this ultimately helps keep my work fresh, up to date and unique.

Dean

02/04/2014No Comments

2D Photo to 3D Virtual Model to 3D Physical Print

3D model libraries exist to allow digital artists to quickly populate their scenes with appropriate content. Using libraries for 3D models can be a time saver, and as such saves money and costs. But what happens when a specific model cannot be found in any library? This can happen quite often, perhaps an architect would like a particular bench outside their building, or an interior designer would like to see a specific item of furniture in their lounge.

The solution is to build the 3D models manually. Using as much information as possible, the 3D artist can turn drawings, dimensions and other references into 3D models. The accuracy of the 3D models is highly dependant on what information can be found. If the item to be modelled can be physically held, studied and measured, then the model will be more accurate than a model created from a handful of photos.

In a recent project I was asked to model the Dark Cross Dining chair.

Black Cross Dining Chair

From the website, we have the above image, and some basic dimensions, and that's all! However from this one image and the measurements I can re-create the chair in 3D. I also used the image to measure the leg thickness, the proportions of the chair, and overall shape and size of various parts. There are some assumptions I made, such as the seat height is similar to a standard dining chair, the chair is symmetrical and the legs are circular. I had to guess other areas, such as the rear of the chair, the curve of the top bar and the shape of the seat.

3D Dining Chair Wireframe

This image shows how the chair is built in 3D. Keeping models simple, and adding detail where needed is my philosophy, and this is evident in this 3D chair. Techniques can be then applied to the model to turn the faceted geometry into smooth curves.

Generally the 3D model would then have textures and materially applied, and rendered inside a scene. This model was created for a client, who only required the 3D model without materials.

I then decided to take this model and use it as a test for 3D printing. The chair didn't require many changes to make the chair printable, however some models will require more work. When creating 3D models for visualisations, the artist will often not model parts which aren't seen, such as the bottom of the chair as this is deemed as unnecessary and time consuming, however with 3D printing, all areas of the model need to be created. Also when 3D printing models, the model needs to meet a certain specification depending of the type of 3D printer that will be used. Some printers require a minimum part thickness of 1mm, so in the case of this chair, when it was scaled to 1/1o the cross detail was thinner than 1mm, so this had to be made thicker.

Once the 3D model is complete, the 3D chair model is then sent to a 3D printing company. There are several companies, all differing in difference services and price. The one I chose to use this time was 3D Print UK. I chose to use them as their pricing is different to other 3D printing companies, as they price on the overall dimension of the 3D model, rather than volume, and as I wanted to print several items (more blog posts to follow) the overall price was better than printing each model separately.

So the 3D models were sent away, and 2 weeks later a little parcel arrived containing the prints....

3D Printed Dining Chair

3D Printed Dining Chair

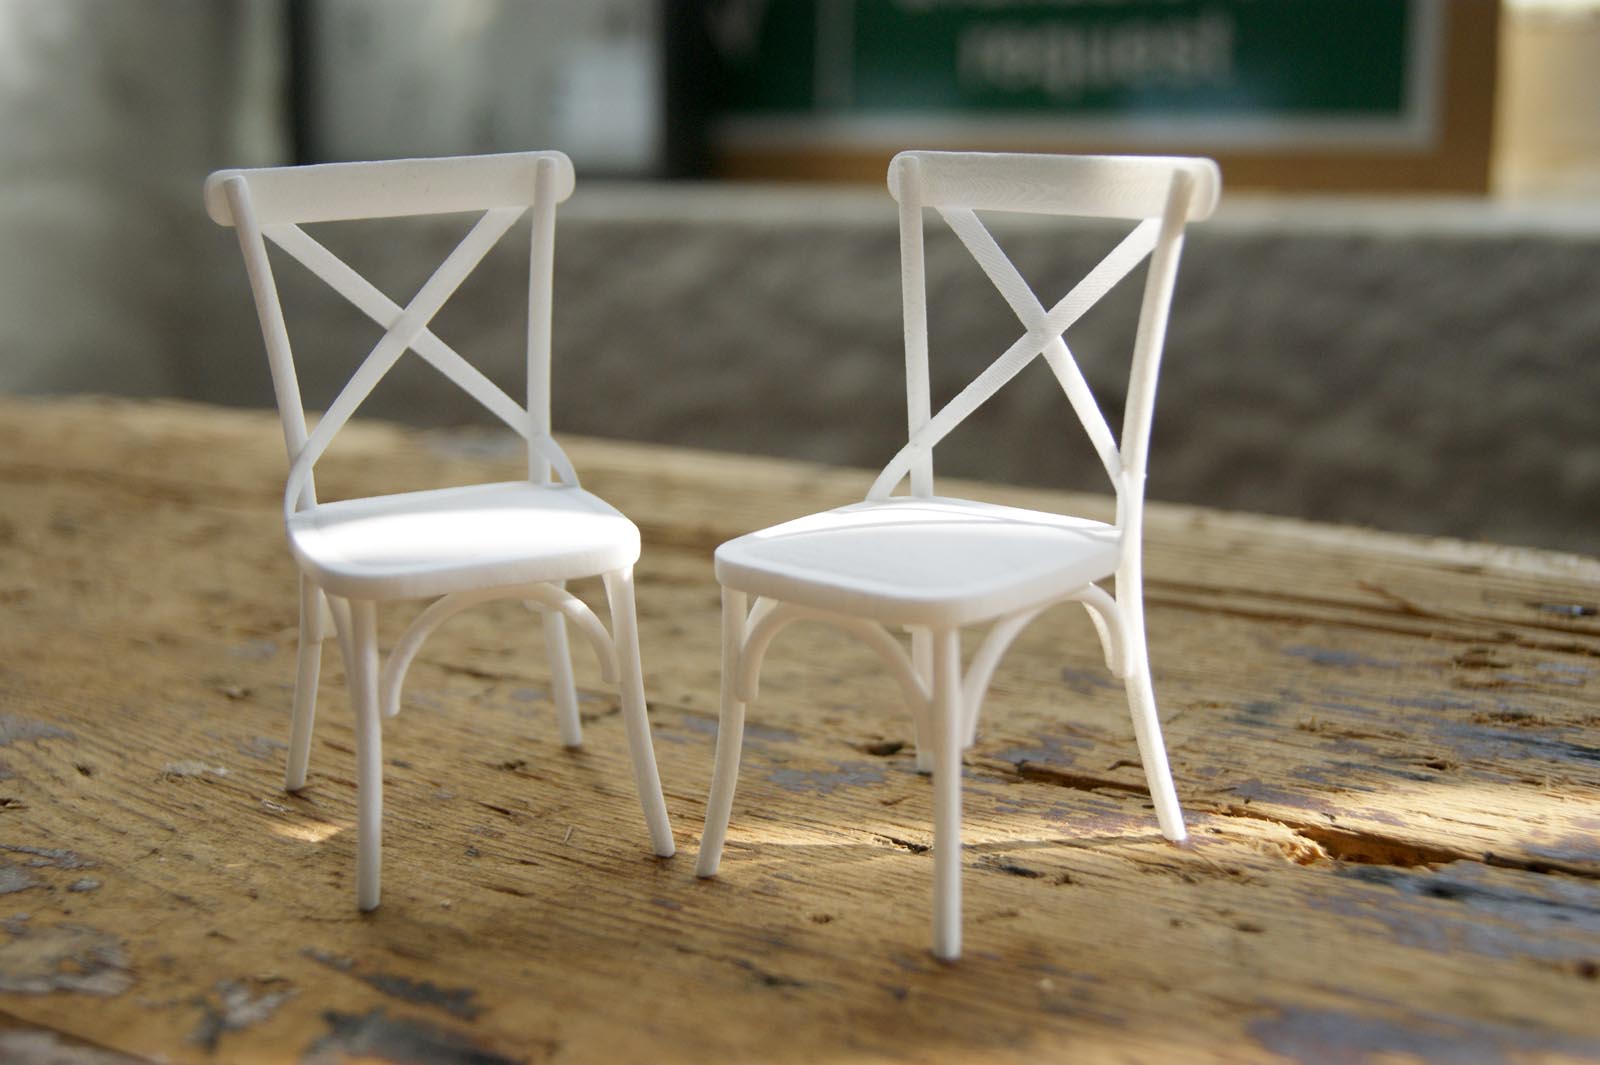
The prints really exceeded my expectations, the level of detail is much better than I had expected, and the strength of the prints are good too. I wasn't sure if the little fixings would be printed, as they are slightly smaller than the minimum specification, but they are still visible.

3D Printed Dining Chair

The finish of the white nylon print is an interesting finish. To touch it feels like an Extra Strong Mint, and visually it does too. The nylon material which the models are printed with is also quite easy to mark, and can also leave little powdery marks on skin and anything else it comes into contact with, although I presume this is left from the printing process, and any loose nylon powder is soon discarded.

I ordered 2 chairs, so I could try painting and finishing a chair.

3D Printed Dining Chair

3D Printed Dining Chair

The finishing of the brown chair was done using Humbrol Airfix paints, but with nylon prints almost any type of finishing can be used. The 3D Print UK site demonstrates using aerosol paints to finish the 3D prints.

Painting and finishing the models is important with nylon prints, not only to add detail, but also to protect the prints from dirt and marks. Even if a white finish is desired, I would still use a clear finish.

3D printing is something I've always been fascinated with, and printing these chairs has only made me more intrigued and more sure that 3D printing will play a huge roll in the very near future. The quality of the prints is very good, perhaps not as detailed as traditional model making processes, but if you consider the lack of tooling needed, and the individuality 3D printing offers then 3D printing is a very viable solution, especially for one-off items, or for rapid prototyping.

The main downside with 3D printing using external companies is the lead time, which in my experience is around 2 weeks. This is still very good, however I see 3D printing as something that could be incredibly useful for rapid prototyping, testing ideas, and playing with concepts.

The other downside is price, £100 doesn't print a lot, and could soon become costly if several iterations of a model were printed. For myself, I see these external print companies useful for finished 3D models, and I plan to purchase a desktop 3D printer for testing and prototyping. Watch this space......

07/02/20121 Comment

What do to for a first blog post? Give stuff away perhaps?

OK, so I have done the introduction post, but that doesn't really count as a blog post does it?

So that leaves me with a challenge, what should the first blog post be? I've always thought that I want the blog to be a mix of 3D, photography, videos, tutorials, news, interesting things, funny things, and anything in-between, as long as it's kind of related to the 3D and CGI industry!

So where should I start?!

Well, after some thinking, I thought it would probably most fitting to start by giving something back to the community. I have always found the generosity and willingness to help others from within the 3D communities quite heart-warming, and they have certainly helped me out when I have become unstuck! So I thought it was about time I gave something back!

Below you can download a few models I have created (I created these for use in my kitchen images in my portfolio). These include storage jars, storage tins and a spaghetti measurer.

I hope they are of some use to you, and please let me know if you actually use them! The models are, in my opinion, good enough for anything from close-ups to distant shots. Feedback is also welcome!

DOWNLOAD

The models be used in any personal or commercial use, I only ask that you do not resell them, or claim credit for creating them! Also instead of passing on the zip file to others, please direct them to this page.

The models are in 3Ds Max format with Vray materials.

In the future, I plan to add more free downloads, so keep your eyes peeled!

Dean

LIKE WHAT YOU SEE?

WANT TO KNOW MORE?

USEFUL LINKS

Site Map
Privacy Policy

Punch Infinity
Switch
Archive
Contact
Subscribe

INSTAGRAM FEED

Wrong or no access token.

PUNCH DIGITAL

Punch Digital Services Ltd

Registered Office :
Peel Walker
11 Victoria Road
Elland
HX5 0AE

Company No:
07938732

VAT No:
GB 282 4398 77